HTML CLASS
HTML INTRODUCTION

What is HTML?
- HTML stands for Hyper Text Markup Language
- HTML is the standard markup language for creating Web pages
- HTML describes the structure of a Web page
- HTML consists of a series of elements
- HTML elements tell the browser how to display the content
- HTML elements label pieces of content such as "this is a heading", "this is a paragraph", "this is a link", etc.
HTML Editors
A simple text editor is all you need to learn HTML.
Learn HTML Using Notepad or TextEdit
Web pages can be created and modified by using professional HTML editors.
However, for learning HTML we recommend a simple text editor like Notepad (PC) or TextEdit (Mac).
We believe that using a simple text editor is a good way to learn HTML.
Follow the steps below to create your first web page with Notepad or TextEdit.
Step 1: Open Notepad (PC)
Windows 8 or later:
Open the Start Screen (the window symbol at the bottom left on your screen). Type Notepad.
Windows 7 or earlier:
Open Start > Programs > Accessories > Notepad
Step 1: Open TextEdit (Mac)
Open Finder > Applications > TextEdit
Also change some preferences to get the application to save files correctly. In Preferences > Format > choose "Plain Text"
Then under "Open and Save", check the box that says "Display HTML files as HTML code instead of formatted text".
Then open a new document to place the code.
Step 2: Write Some HTML
Write or copy the following HTML code into Notepad:
<!DOCTYPE html>
<html>
<body>
<h1>My First Heading</h1>
<p>My first paragraph.</p>
</body>
Step 3: Save the HTML Page
Save the file on your computer. Select File > Save as in the Notepad menu.
Name the file "index.htm" and set the encoding to UTF-8 (which is the preferred encoding for HTML files).
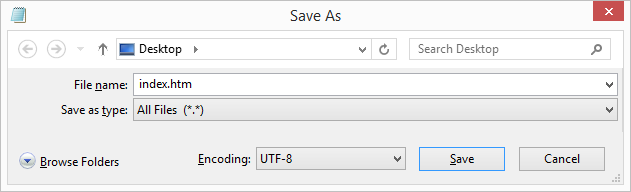
Tip: You can use either .htm or .html as file extension. There is no difference; it is up to you.
Step 4: View the HTML Page in Your Browser
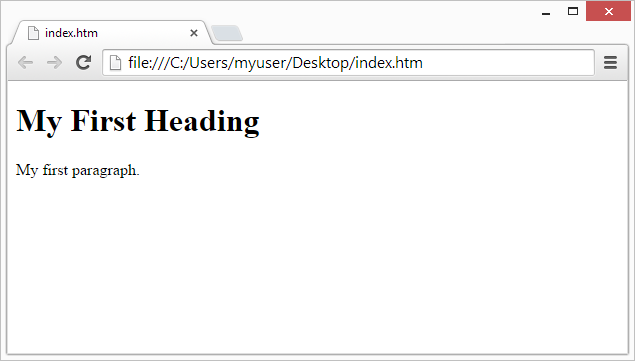
Open the saved HTML file in your favorite browser (double click on the file, or right-click - and choose "Open with").
The result will look much like this:
Example Explained
- The
<!DOCTYPE html>declaration defines that this document is an HTML5 document - The
<html>element is the root element of an HTML page - The
<head>element contains meta information about the HTML page - The
<title>element specifies a title for the HTML page (which is shown in the browser's title bar or in the page's tab) - The
<body>element defines the document's body, and is a container for all the visible contents, such as headings, paragraphs, images, hyperlinks, tables, lists, etc. - The
<h1>element defines a large heading - The
<p>element defines a paragraph
What is an HTML Element?
An HTML element is defined by a start tag, some content, and an end tag:
The HTML element is everything from the start tag to the end tag:
| Start tag | Element content | End tag |
|---|---|---|
| <h1> | My First Heading | </h1> |
| <p> | My first paragraph. | </p> |
| <br> | none | none |
Note: Some HTML elements have no content (like the <br> element). These elements are called empty elements. Empty elements do not have an end tag!
HTML Basic Examples
In this chapter we will show some basic HTML examples.
Don't worry if we use tags you have not learned about yet.
HTML Documents
All HTML documents must start with a document type declaration: <!DOCTYPE html>.
The HTML document itself begins with <html> and ends with </html>.
The visible part of the HTML document is between <body> and </body>.
Example
<!DOCTYPE html>
<html>
<body>
<h1>My First Heading</h1>
<p>My first paragraph.</p>
</body>
</html>The <!DOCTYPE> Declaration
The <!DOCTYPE> declaration represents the document type, and helps browsers to display web pages correctly.
It must only appear once, at the top of the page (before any HTML tags).
The <!DOCTYPE> declaration is not case sensitive.
The <!DOCTYPE> declaration for HTML5 is:
<!DOCTYPE html>HTML Headings
HTML headings are defined with the <h1> to <h6> tags.
<h1> defines the most important heading. <h6> defines the least important heading:
Example
<h1>This is heading 1</h1>
<h2>This is heading 2</h2>
<h3>This is heading 3</h3>HTML Paragraphs
HTML paragraphs are defined with the <p> tag:
Example
<p>This is a paragraph.</p>
<p>This is another paragraph.</p>HTML Links
HTML links are defined with the <a> tag:
Example
<a href="https://www.GOOGLE.com">This is a link</a>The link's destination is specified in the href attribute.
Attributes are used to provide additional information about HTML elements.
You will learn more about attributes in a later chapter.
HTML Images
HTML images are defined with the <img> tag.
The source file (src), alternative text (alt), width, and height are provided as attributes:
Example
<img src="CARD.jpg" alt="GOOGLE.com" width="104" height="142">How to View HTML Source
Have you ever seen a Web page and wondered "Hey! How did they do that?"
View HTML Source Code:
Click CTRL + U in an HTML page, or right-click on the page and select "View Page Source". This will open a new tab containing the HTML source code of the page.
Inspect an HTML Element:
Right-click on an element (or a blank area), and choose "Inspect" to see what elements are made up of (you will see both the HTML and the CSS). You can also edit the HTML or CSS on-the-fly in the Elements or Styles panel that opens.
HTML Elements
An HTML element is defined by a start tag, some content, and an end tag.
HTML Elements
The HTML element is everything from the start tag to the end tag:
Examples of some HTML elements:
| Start tag | Element content | End tag |
|---|---|---|
| <h1> | My First Heading | </h1> |
| <p> | My first paragraph. | </p> |
| <br> | none | none |
Note: Some HTML elements have no content (like the <br> element). These elements are called empty elements. Empty elements do not have an end tag!
Nested HTML Elements
HTML elements can be nested (this means that elements can contain other elements).
All HTML documents consist of nested HTML elements.
The following example contains four HTML elements (<html>, <body>, <h1> and <p>):
Example
<!DOCTYPE html>
<html>
<body>
<h1>My First Heading</h1>
<p>My first paragraph.</p>
</body>
</html>Example Explained
The <html> element is the root element and it defines the whole HTML document.
It has a start tag <html> and an end tag </html>.
Then, inside the <html> element there is a <body> element:
<body>
<h1>My First Heading</h1>
<p>My first paragraph.</p>
</body>The <body> element defines the document's body.
It has a start tag <body> and an end tag </body>.
Then, inside the <body> element there are two other elements: <h1> and <p>:
<h1>My First Heading</h1>
<p>My first paragraph.</p>The <h1> element defines a heading.
It has a start tag <h1> and an end tag </h1>:
<h1>My First Heading</h1>The <p> element defines a paragraph.
It has a start tag <p> and an end tag </p>:
<p>My first paragraph.</p>Never Skip the End Tag
Some HTML elements will display correctly, even if you forget the end tag:
Example
<html>
<body>
<p>This is a paragraph
<p>This is a paragraph
</body>
</html>However, never rely on this! Unexpected results and errors may occur if you forget the end tag!
Empty HTML Elements
HTML elements with no content are called empty elements.
The <br> tag defines a line break, and is an empty element without a closing tag:
Example
<p>This is a <br> paragraph with a line break.</p>HTML is Not Case Sensitive
HTML tags are not case sensitive: <P> means the same as <p>.
The HTML standard does not require lowercase tags, but W3C recommends lowercase in HTML, and demands lowercase for stricter document types like XHTML.
At W3Schools we always use lowercase tag names.
HTML Tag Reference
W3Schools' tag reference contains additional information about these tags and their attributes.
| Tag | Description |
|---|---|
| <html> | Defines the root of an HTML document |
| <body> | Defines the document's body |
| <h1> to <h6> | Defines HTML headings |
HTML ATTRIBUTES

HTML Attributes
HTML attributes provide additional information about HTML elements.
HTML Attributes
- All HTML elements can have attributes
- Attributes provide additional information about elements
- Attributes are always specified in the start tag
- Attributes usually come in name/value pairs like: name="value"
The href Attribute
The <a> tag defines a hyperlink. The href attribute specifies the URL of the page the link goes to:
Example
<a href="https://www.w3schools.com">Visit W3Schools</a>You will learn more about links in our HTML Links chapter.
The src Attribute
The <img> tag is used to embed an image in an HTML page. The src attribute specifies the path to the image to be displayed:
Example
<img src="img_girl.jpg">There are two ways to specify the URL in the src attribute:
1. Absolute URL - Links to an external image that is hosted on another website. Example: src="https://www.w3schools.com/images/img_girl.jpg".
Notes: External images might be under copyright. If you do not get permission to use it, you may be in violation of copyright laws. In addition, you cannot control external images; it can suddenly be removed or changed.
2. Relative URL - Links to an image that is hosted within the website. Here, the URL does not include the domain name. If the URL begins without a slash, it will be relative to the current page. Example: src="img_girl.jpg". If the URL begins with a slash, it will be relative to the domain. Example: src="/images/img_girl.jpg".
Tip: It is almost always best to use relative URLs. They will not break if you change domain.
The width and height Attributes
The <img> tag should also contain the width and height attributes, which specify the width and height of the image (in pixels):
Example
<img src="img_girl.jpg" width="500" height="600">The alt Attribute
The required alt attribute for the <img> tag specifies an alternate text for an image, if the image for some reason cannot be displayed. This can be due to a slow connection, or an error in the src attribute, or if the user uses a screen reader.
Example
<img src="img_girl.jpg" alt="Girl with a jacket">Example
See what happens if we try to display an image that does not exist:
<img src="img_typo.jpg" alt="Girl with a jacket">You will learn more about images in our HTML Images chapter.
The style Attribute
The style attribute is used to add styles to an element, such as color, font, size, and more.
Example
<p style="color:red;">This is a red paragraph.</p>You will learn more about styles in our HTML Styles chapter.
The lang Attribute
You should always include the lang attribute inside the <html> tag, to declare the language of the Web page. This is meant to assist search engines and browsers.
The following example specifies English as the language:
<!DOCTYPE html>
<html lang="en">
<body>
...
</body>
</html>Country codes can also be added to the language code in the lang attribute. So, the first two characters define the language of the HTML page, and the last two characters define the country.
The following example specifies English as the language and United States as the country:
<!DOCTYPE html>
<html lang="en-US">
<body>
...
</body>
</html>You can see all the language codes in our HTML Language Code Reference.
The title Attribute
The title attribute defines some extra information about an element.
The value of the title attribute will be displayed as a tooltip when you mouse over the element:
Example
<p title="I'm a tooltip">This is a paragraph.</p>We Suggest: Always Use Lowercase Attributes
The HTML standard does not require lowercase attribute names.
The title attribute (and all other attributes) can be written with uppercase or lowercase like title or TITLE.
However, W3C recommends lowercase attributes in HTML, and demands lowercase attributes for stricter document types like XHTML.
At W3Schools we always use lowercase attribute names.
We Suggest: Always Quote Attribute Values
The HTML standard does not require quotes around attribute values.
However, W3C recommends quotes in HTML, and demands quotes for stricter document types like XHTML.
Good:
<a href="https://www.w3schools.com/html/">Visit our HTML tutorial</a>Bad:
<a href=https://www.w3schools.com/html/>Visit our HTML tutorial</a>Sometimes you have to use quotes. This example will not display the title attribute correctly, because it contains a space:
Example
<p title=Description of W3Schools>At W3Schools we always use quotes around attribute values.
Single or Double Quotes?
Double quotes around attribute values are the most common in HTML, but single quotes can also be used.
In some situations, when the attribute value itself contains double quotes, it is necessary to use single quotes:
<p title='John "ShotGun" Nelson'>Or vice versa:
<p title="John 'ShotGun' Nelson">Chapter Summary
- All HTML elements can have attributes
- The
hrefattribute of<a>specifies the URL of the page the link goes to - The
srcattribute of<img>specifies the path to the image to be displayed - The
widthandheightattributes of<img>provide size information for images - The
altattribute of<img>provides an alternate text for an image - The
styleattribute is used to add styles to an element, such as color, font, size, and more - The
langattribute of the<html>tag declares the language of the Web page - The
titleattribute defines some extra information about an element


Comments
Post a Comment